Part 1: Cloudflare ZTNA — Web Filtering
Introduction
This is Part 1 of the 4-part Cloudflare Zero Trust Network Access (ZTNA) series. In Part 0 we set up the Cloudflare One Client and tested a successful ZTNA connectivity. If you have not read that yet, I would recommend starting there before following along here.
In this post we are looking at web filtering — what it is and how to configure it using Cloudflare Zero Trust.
What is Web Filtering and Why is it Required?
Web filtering controls what a user can or cannot access on the internet. The reasons for doing it depend on who you are.
For regular users it is mostly about safety. Phishing sites, malicious ads, content you do not want your kids stumbling across, or simply cutting out things that do not align with your personal taste. Web filtering gives you that control.
For enterprise users the problem is bigger. A corporate device hitting a malware-laced site can be the entry point for a full blown breach. Beyond security, companies also need to stay compliant with regulatory frameworks — and that means having visibility and control over what employees are accessing. Web filtering is one of the ways to enforce that.
Cloudflare Zero Trust sits right in the middle of all this traffic and gives you the tools to define exactly what is allowed and what is not. Let’s get into it.
How Does Web Filtering Work?
Every website on the internet is assigned one or more categories by the firewall or the web filtering solution. When a user tries to visit a website, the firewall checks what category that domain falls into and then decides — allow or block — based on the policies you have configured.
Cloudflare provides a tool to look up how any domain is categorised.
💡 Cloudflare Radar — Domain Categorisation
Cloudflare Radar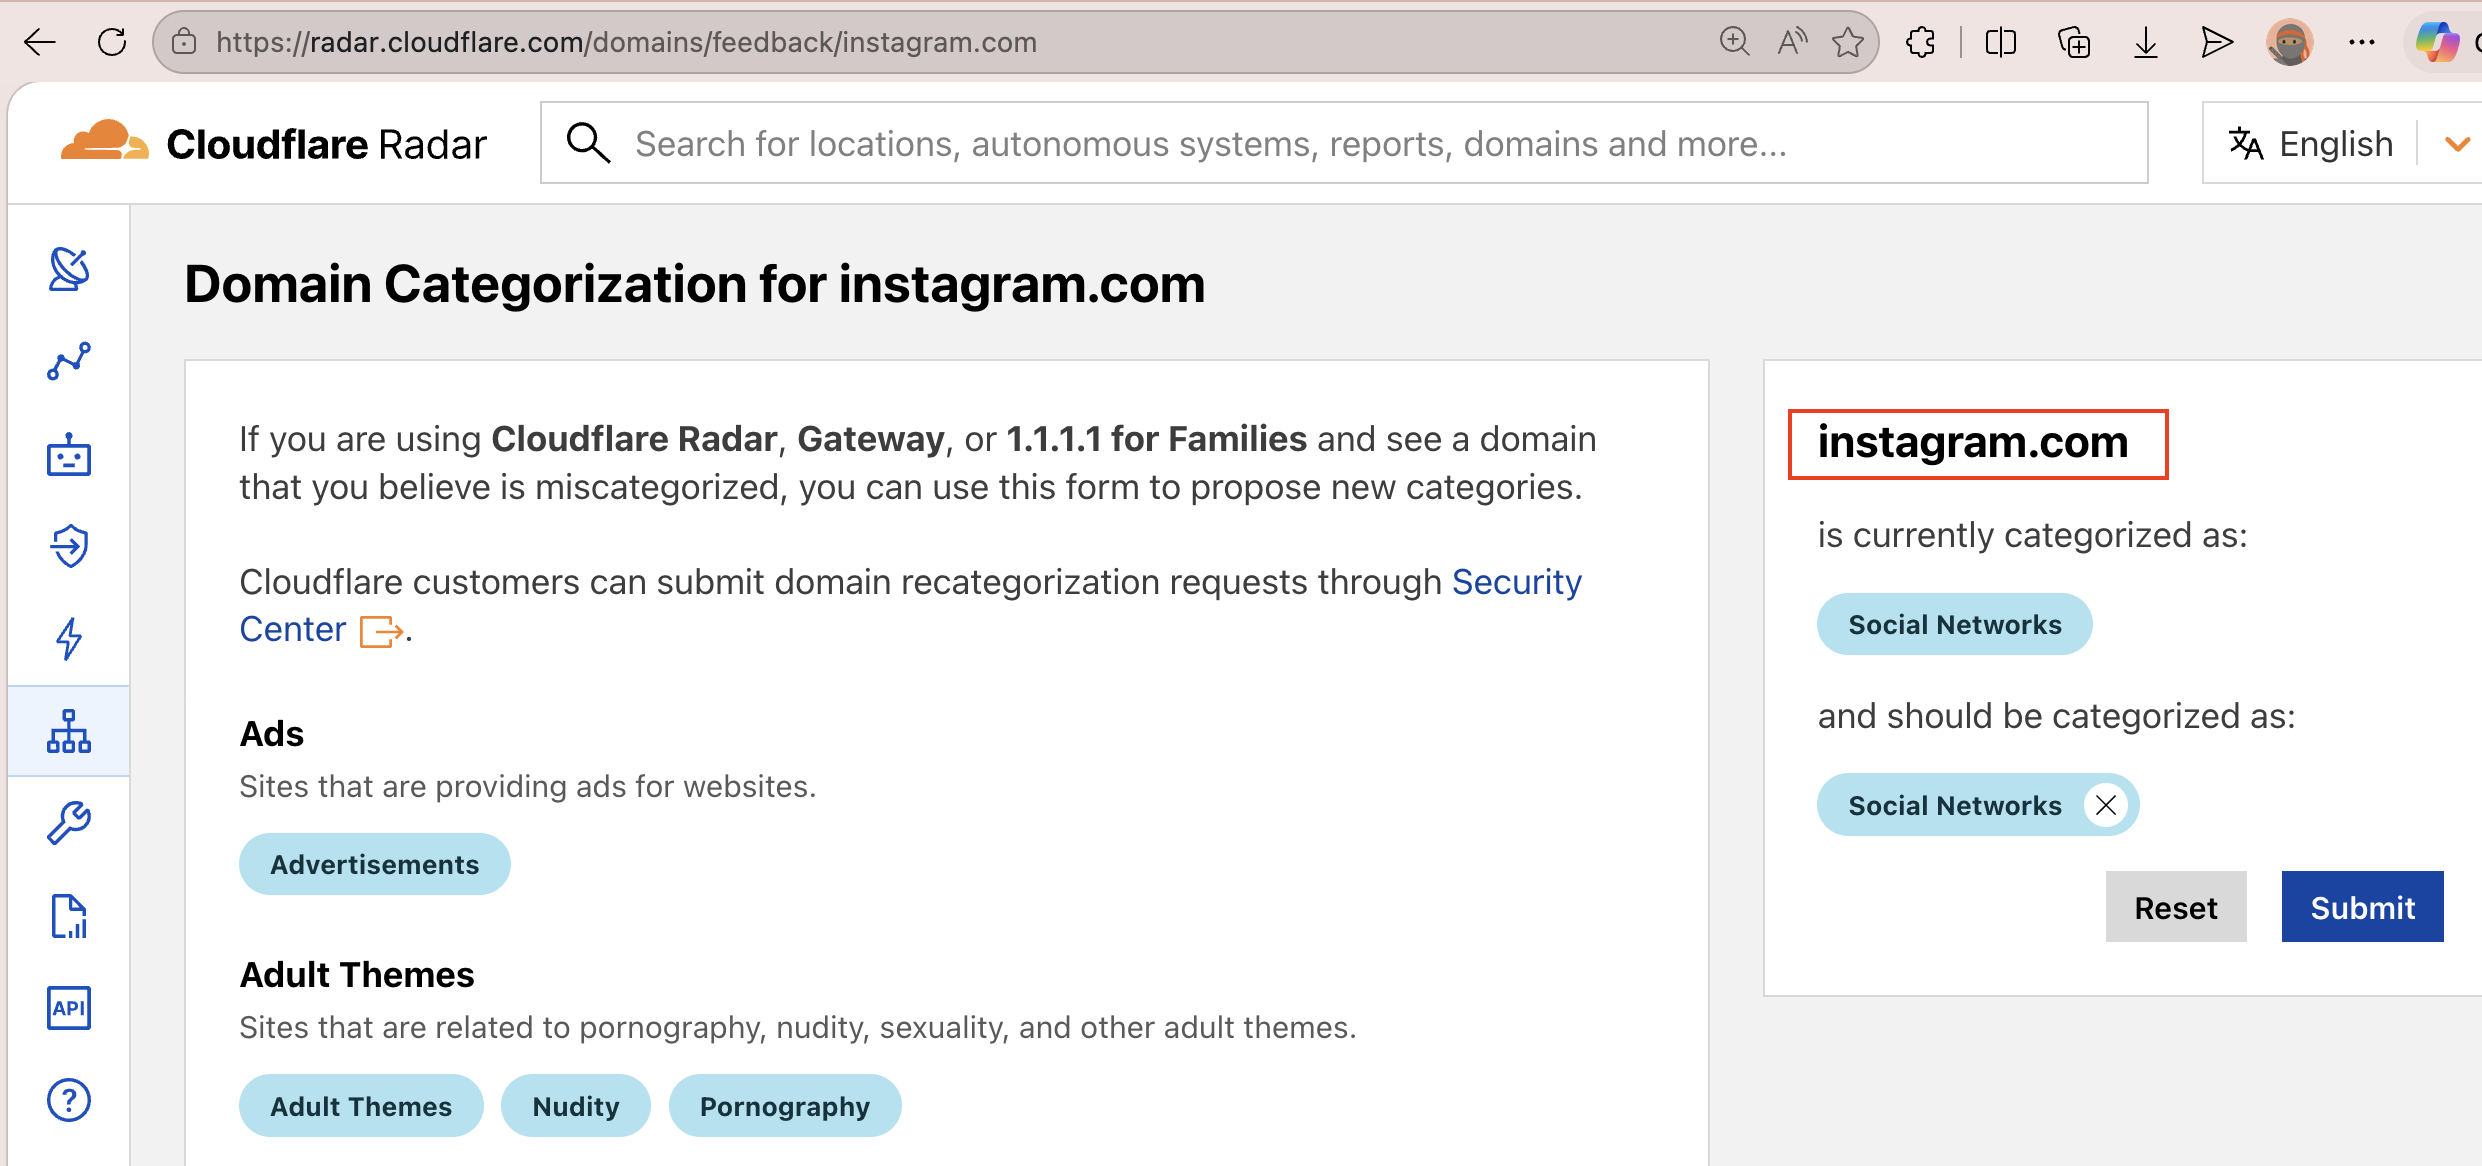
So instead of manually blocking thousands of individual URLs, you simply say — “block everything in the Social Media category” — and the firewall handles the rest.
Implementation
I will use the same CloudflareZeroTrustNetwork github project from part0 to create the required cloudflare resources for web filtering.
All the Cloudflare categories are defined as a variable in a dedicated terraform file. Each category is commented out by default — uncomment the ones you want to block. I have already uncommented a few to get you started.
For testing I am using social media websites as the target — and honestly, thanks to Australia for banning social media for under 16s, this example feels very timely. 😀
One thing I want to call out — test one policy (DNS/HTTP/Network) at a time. The way this is structured, each policy has a flag in Terraform. Set it to true to enable it, test it, then set it back to false before testing the next one. This keeps things clean and makes it much easier to know exactly what is blocking what. Mixing multiple active policies while testing is a recipe for confusion.
DNS Firewall Policy
How It Works
Every time you type a URL in the browser, before anything loads, your device makes a DNS query — essentially asking “what is the IP address for this domain?”. DNS blocking intercepts this query and simply refuses to resolve the domain if it matches a blocked category. The browser never gets the IP, the connection never happens, and the user sees an error page.
Terraform Init, Plan and Apply
Uncomment the module cloudflare_web_filtering in cloudflare.tf file and set the dns_policy flag to true followed by terraform apply.
module "cloudflare_web_filtering" {
  source = "./cloudflare/1.web_filtering"
  providers = {
    cloudflare = cloudflare
  }
  unique_id      = var.unique_id
  account_id     = var.account_id
  dns_policy     = true
  http_policy    = false
  network_policy = false
}
⚠️ Note — Resource Destruction Warning
When you run terraform apply, you may see a warning about cloudflare_zero_trust_gateway_settings not being destroyable from Terraform. Cloudflare treats gateway settings as a singleton — there is only one per account and the API does not support deleting it, only updating it. If you run terraform destroy, Terraform will remove it from its state file but the settings will remain in your Cloudflare account untouched. You would need to reset them manually from the dashboard if needed.
⚠️ Manual Step Required — TLS Certificate Activation Terraform will create the TLS certificate resource, but the Cloudflare provider does not support activating it programmatically — this is a current provider limitation. After running terraform apply, you need to activate the certificate manually from the dashboard: Zero Trust → Traffic policies → Traffic settings → Certificates → Activate followed by Mark as in-use
Terraform Provisioned Resources on Cloudflare
Head over to Zero Trust → Traffic Policies → Firewall Policies → DNS and you should see Firewall DNS Policy listed there.
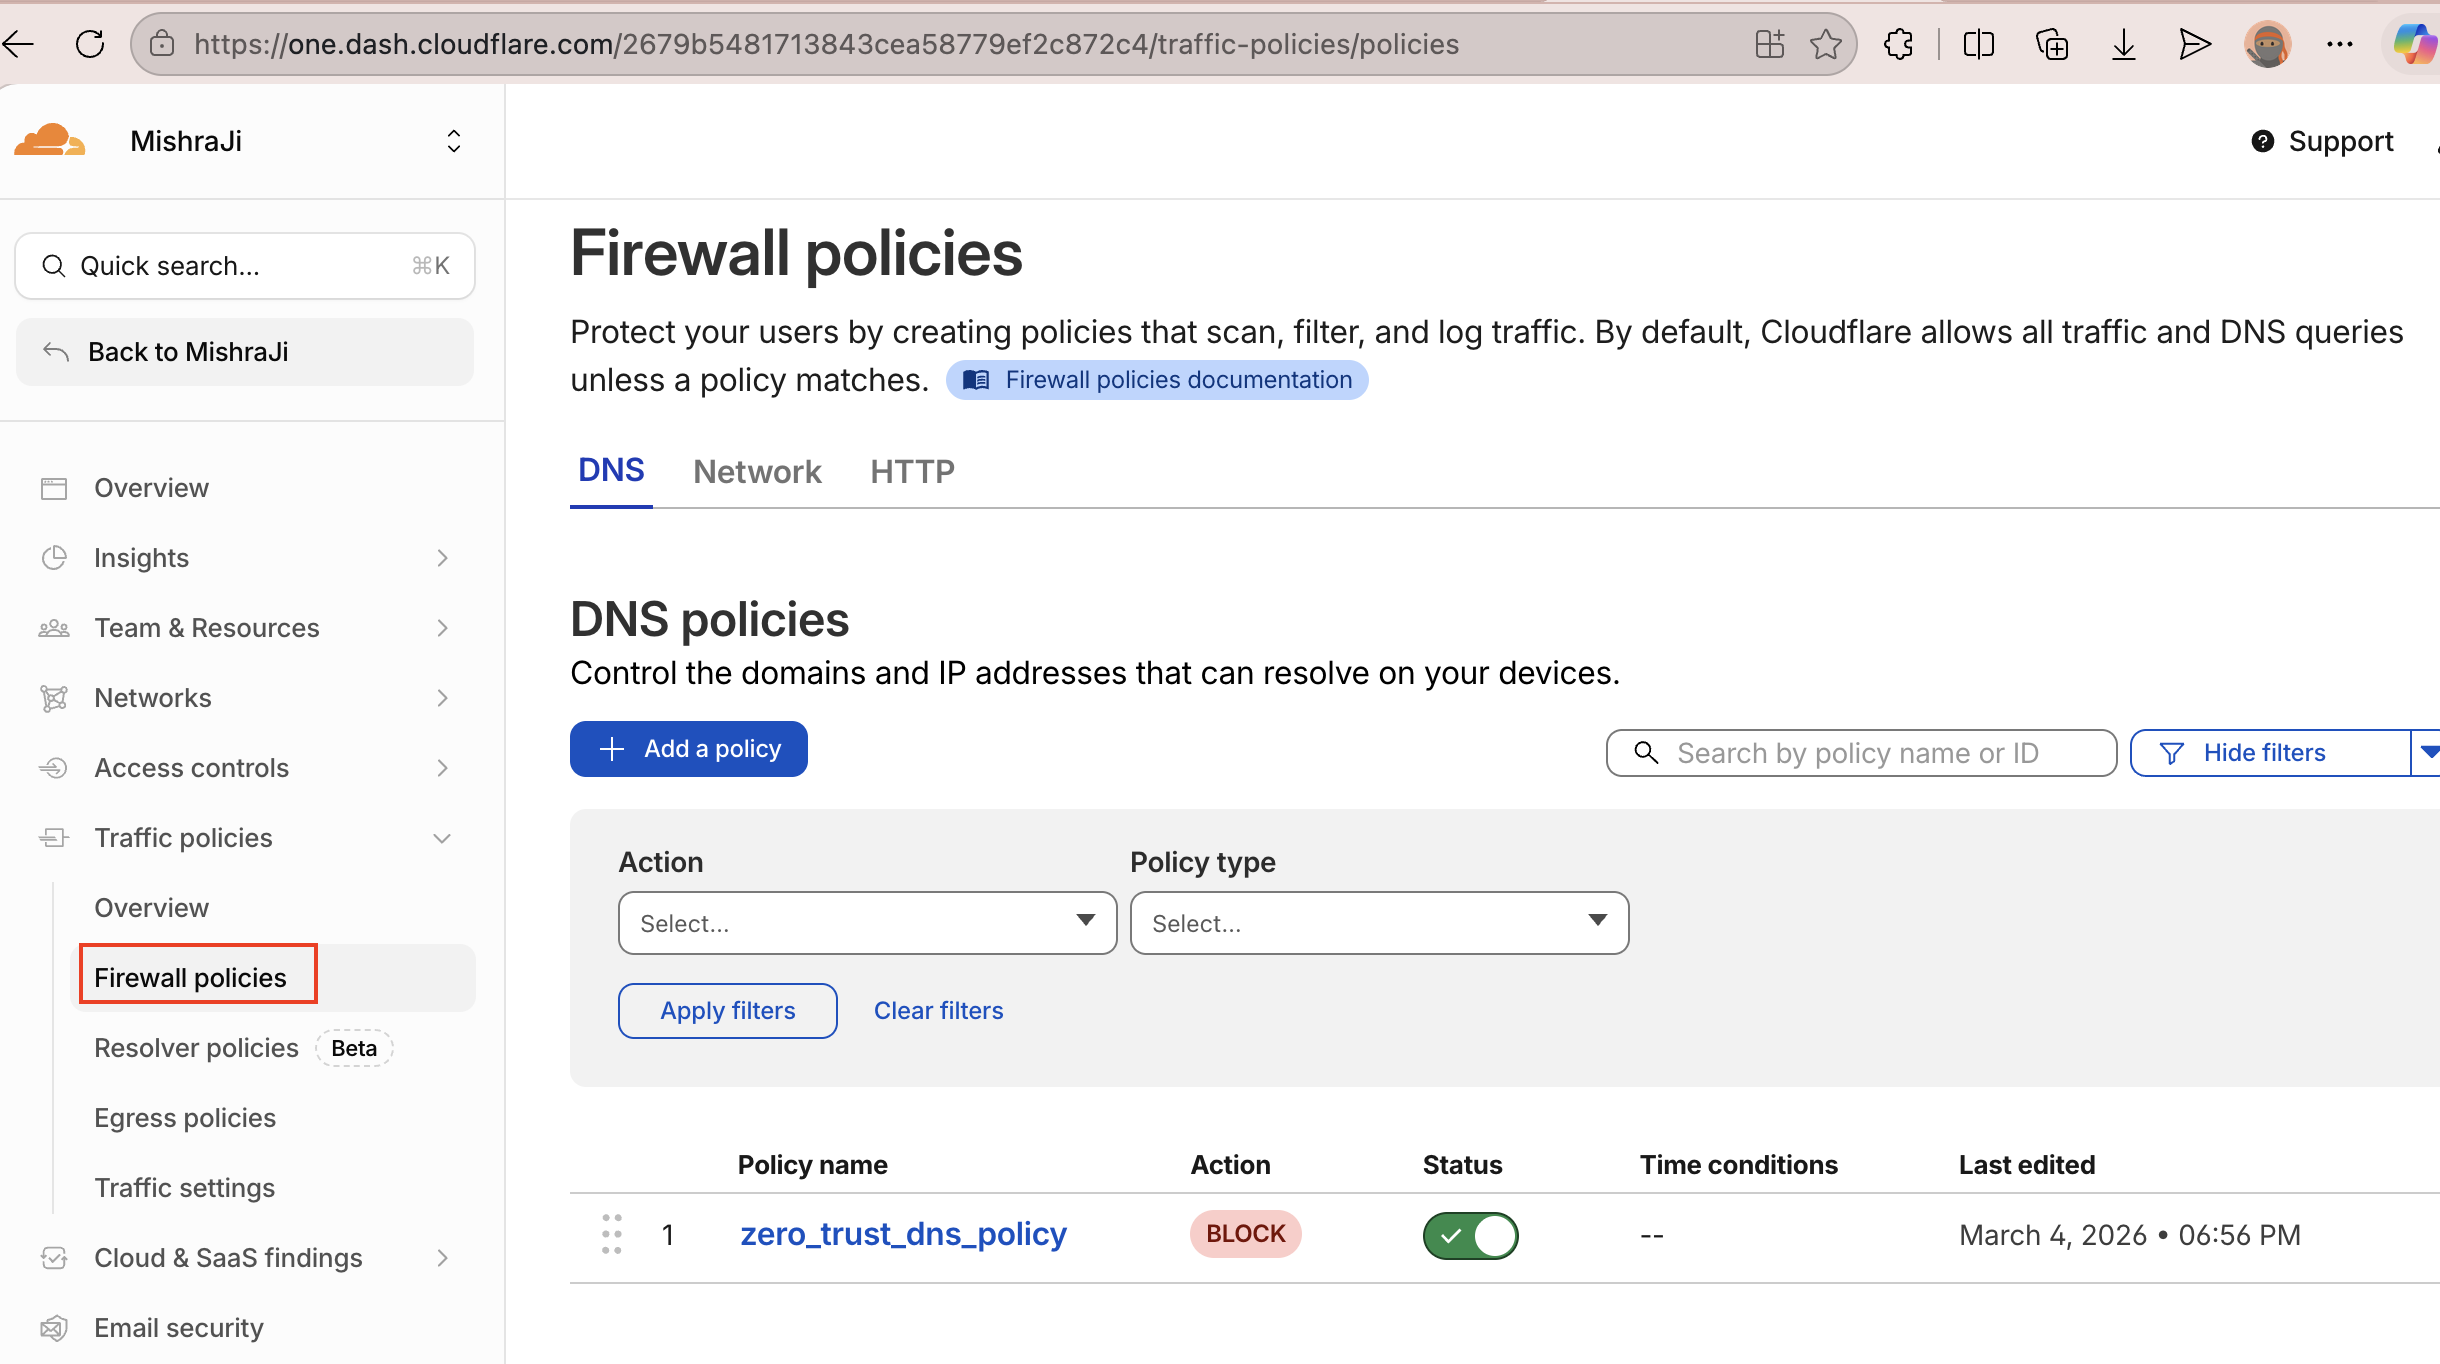
Firewall DNS Policy
Testing
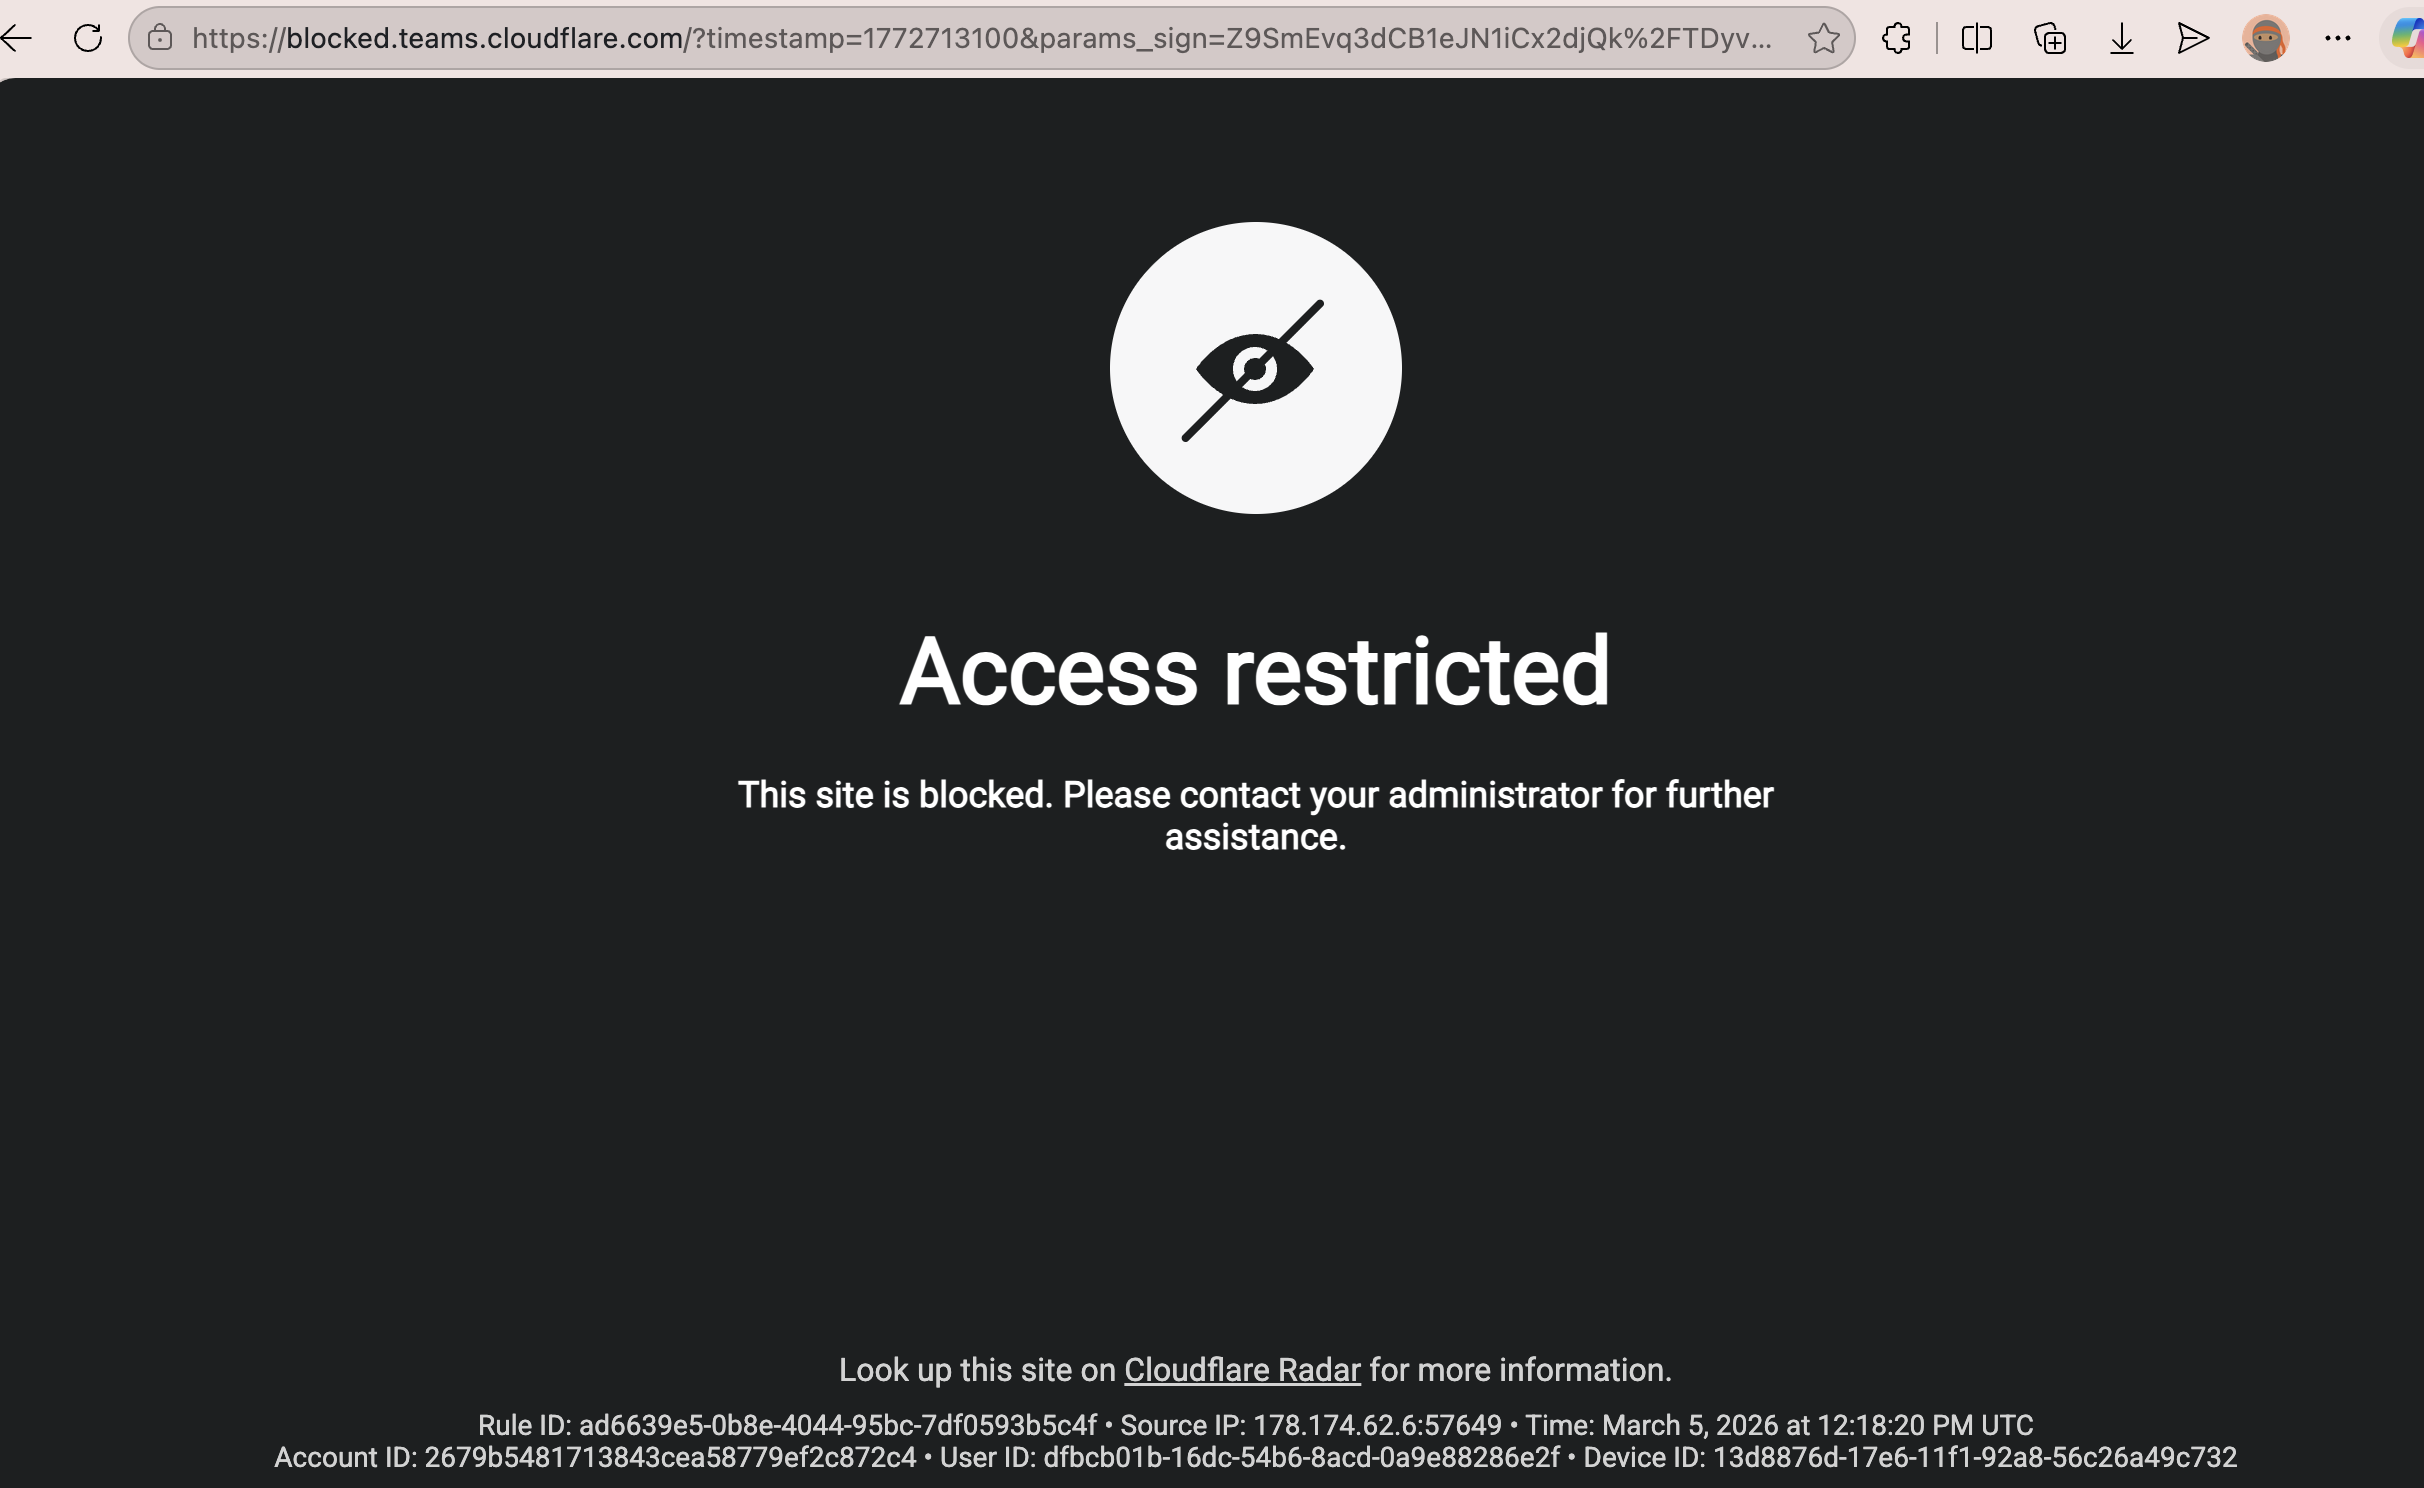
Browser — visit any social media site like instagram.com or facebook.com while connected to the Cloudflare One Client. You should hit a block page.
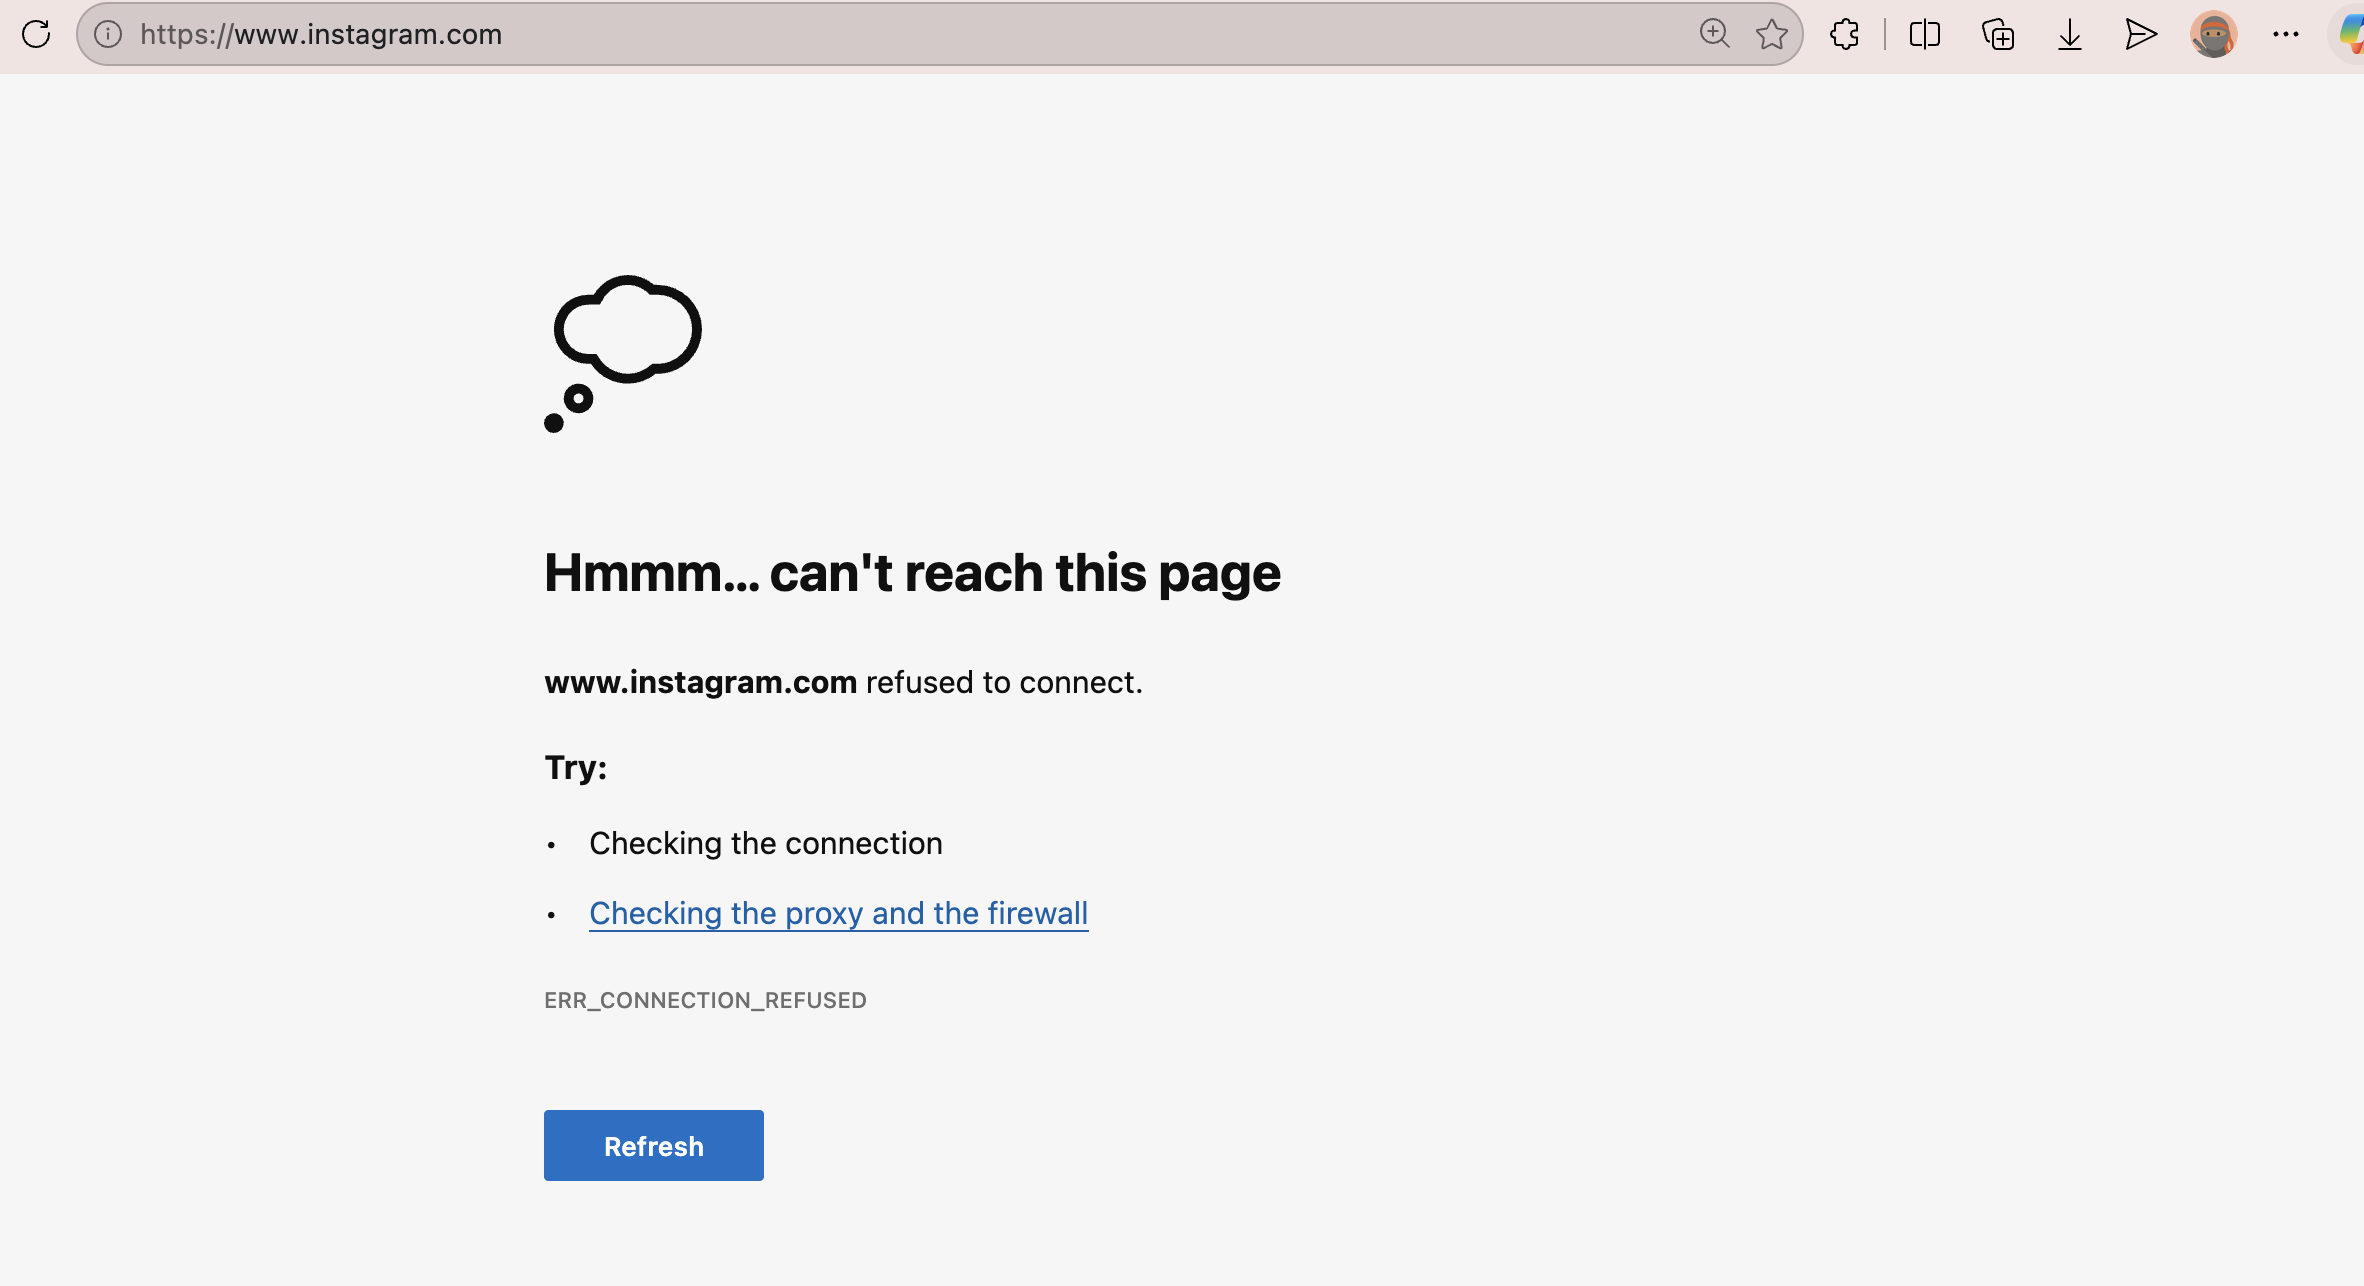
Page Blocked By DNS Policy
CLI — use dig to check if the domain resolves. If the policy is working, Cloudflare will return 0.0.0.0 instead of a real IP — confirming the DNS query was blocked.
dig instagram.com
# Blocked response looks like this
instagram.com.    60    IN    A    0.0.0.0
HTTP Firewall Policy
How It Works
DNS blocking is great but it has a blind spot — it only looks at the domain. It cannot know what is actually happening inside the HTTP/S traffic. e.g. I want to allow example.com but block .exe files from being downloaded, this is simply not possible through DNS policy. Another example would be - making sure company sensitive data is not being uploaded on malicious sites. That is where the HTTP firewall policy comes in.
Instead of blocking at the DNS resolution stage, HTTP filtering inspects the actual web request. This means Cloudflare can make smarter decisions — block specific URLs, inspect request content, and serve a custom block page to the user instead of a generic browser error.
Prerequisites
The following settings should be enabled for http policies to be effective.
TLS Inspection
By default, Gateway will only inspect HTTP traffic through port 80. Additionally, if you turn on TLS decryption, Gateway will inspect HTTPS traffic through port 443. Cloudflare Docs
resource "cloudflare_zero_trust_gateway_settings" "gateway_settings" {
  account_id = var.account_id
  settings = {
    certificate = {
      id = cloudflare_zero_trust_gateway_certificate.gateway_certificate.id
    }
    tls_decrypt = {
      enabled = true
    }
    protocol_detection = {
      enabled = true
    }
    #inspection is applied on all ports
    inspection = {
      mode = "dynamic"
    }
  }
}
Traffic Proxy
With Cloudflare Gateway, you can log and filter DNS, network, and HTTP traffic from devices running the WARP client. This includes traffic to the public Internet and traffic directed to your private network. DNS filtering is enabled by default since the WARP client sends DNS queries to Cloudflare’s public DNS resolver, 1.1.1.1. To enable network and HTTP filtering, you will need to allow Cloudflare Gateway to proxy that traffic. Cloudflare Docs
resource "cloudflare_zero_trust_device_settings" "device_settings" {
  account_id                            = var.account_id
  gateway_proxy_enabled                 = true # required for http and network firewall policies
  gateway_udp_proxy_enabled             = true
  root_certificate_installation_enabled = true
}
Terraform Provisioned Resources on Cloudflare
Head over to Zero Trust → Traffic Policies → Firewall Policies → HTTP and you should see Firewall HTTP Policy listed there. It also configures the following settings —
- A TLS certificate and enables TLS Inspection
- Secure Web Gateway proxy — to route general internet traffic through Cloudflare Gateway
- Protocol Detection — to apply HTTP policies on any port. Without this, HTTP policies only apply to traffic on port 80 and 443
- A custom error page
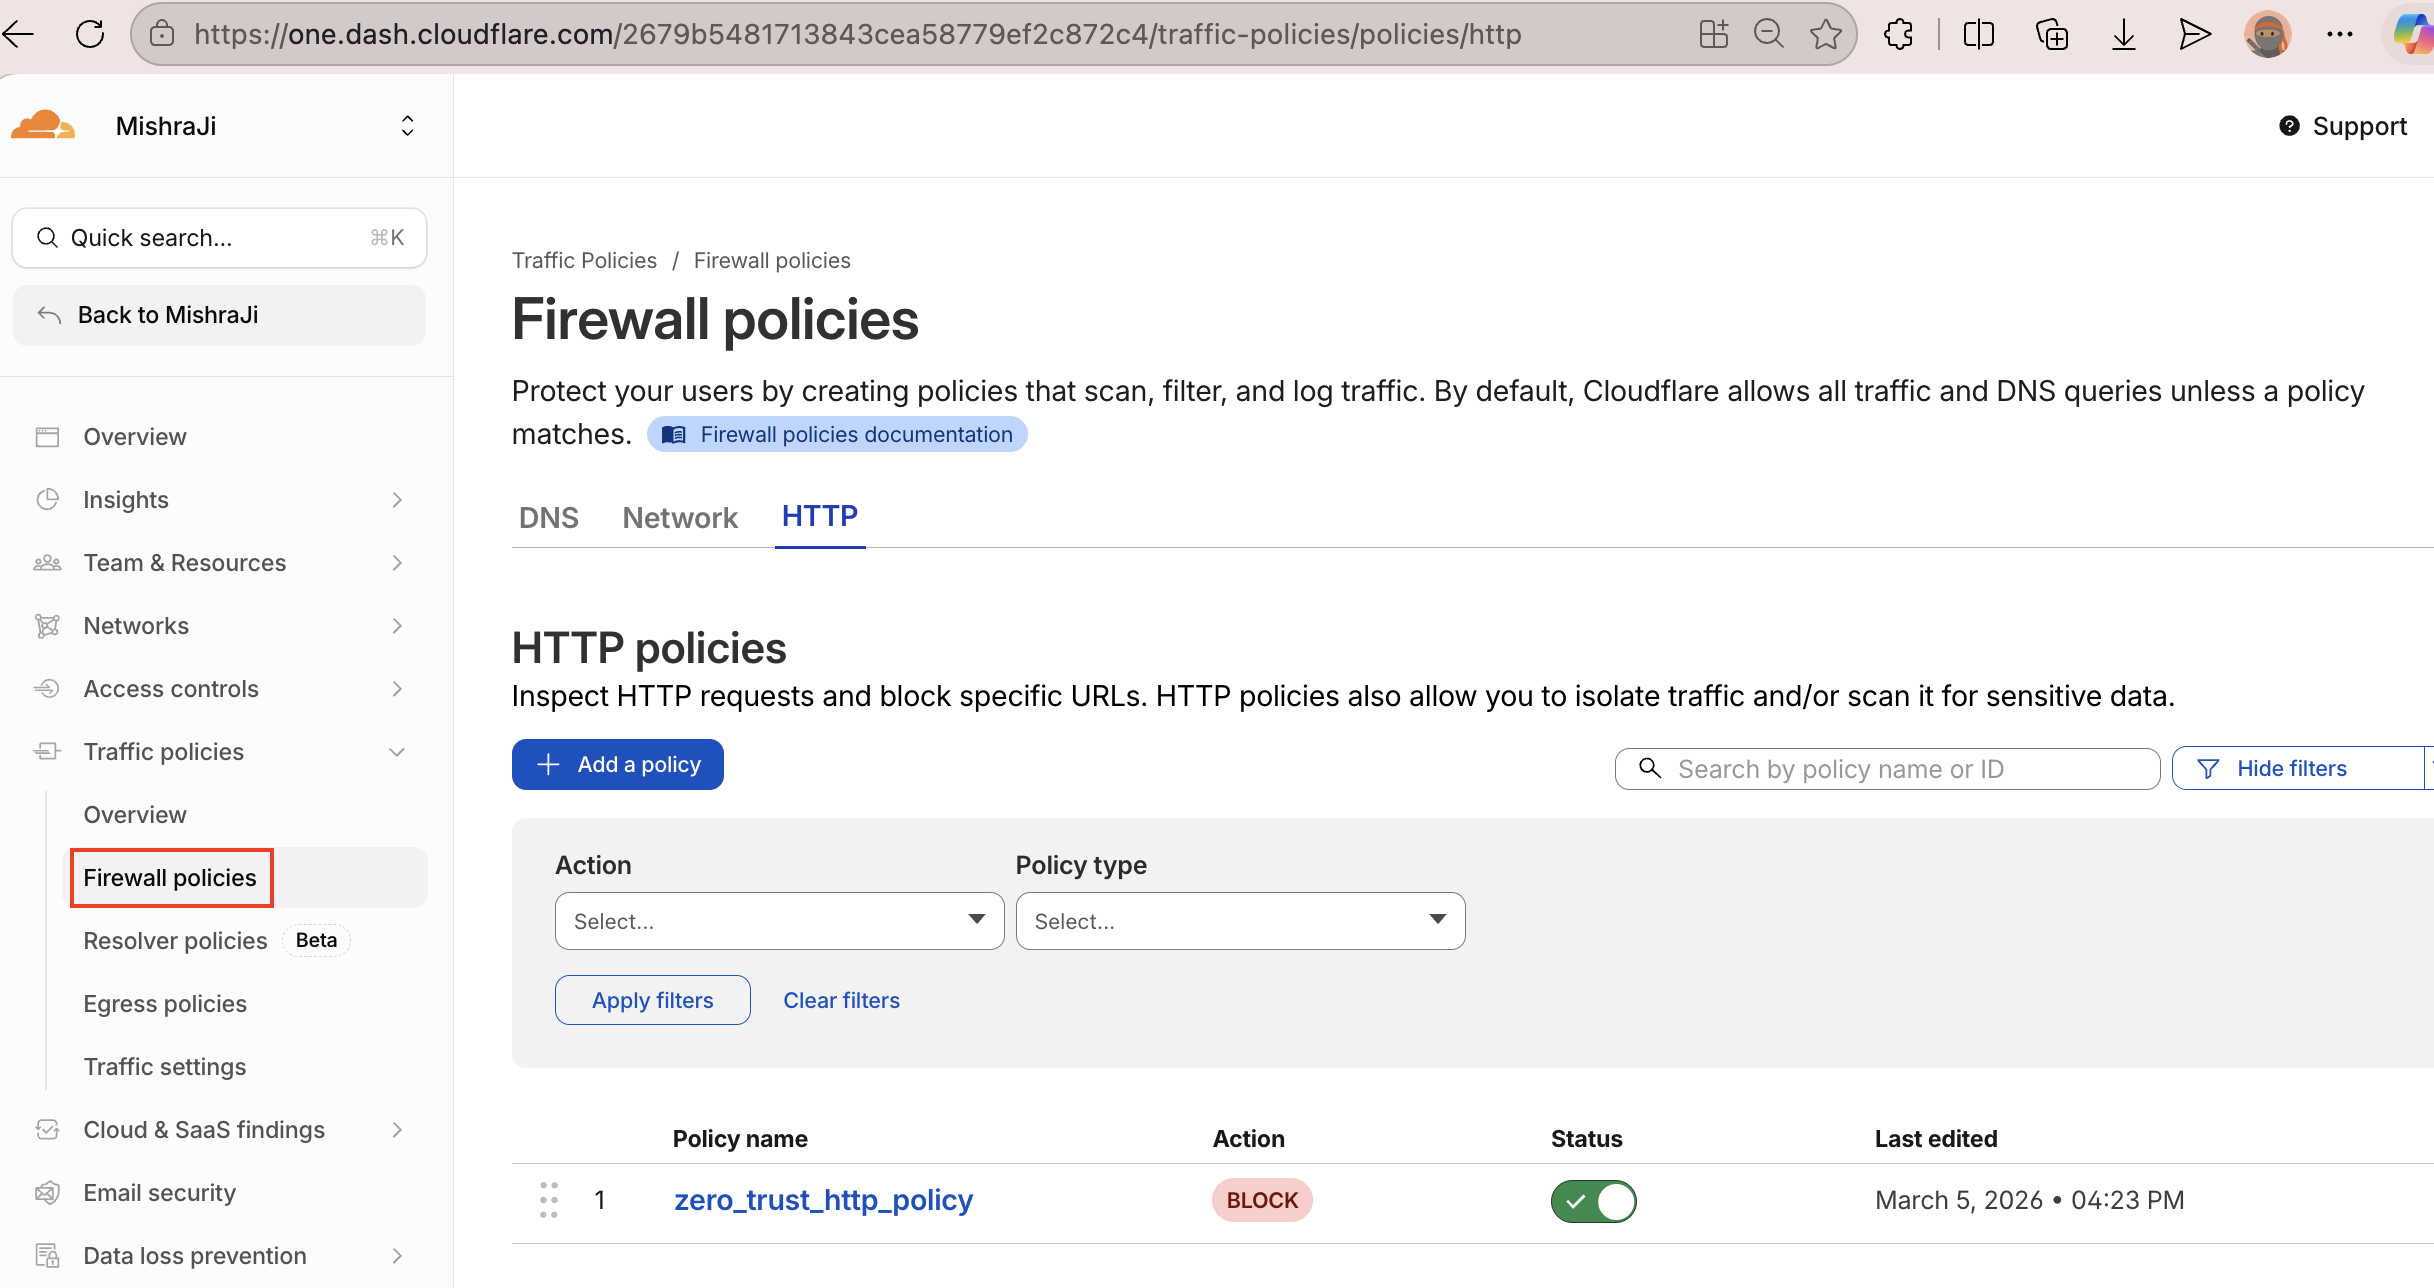
Firewall HTTP Policy
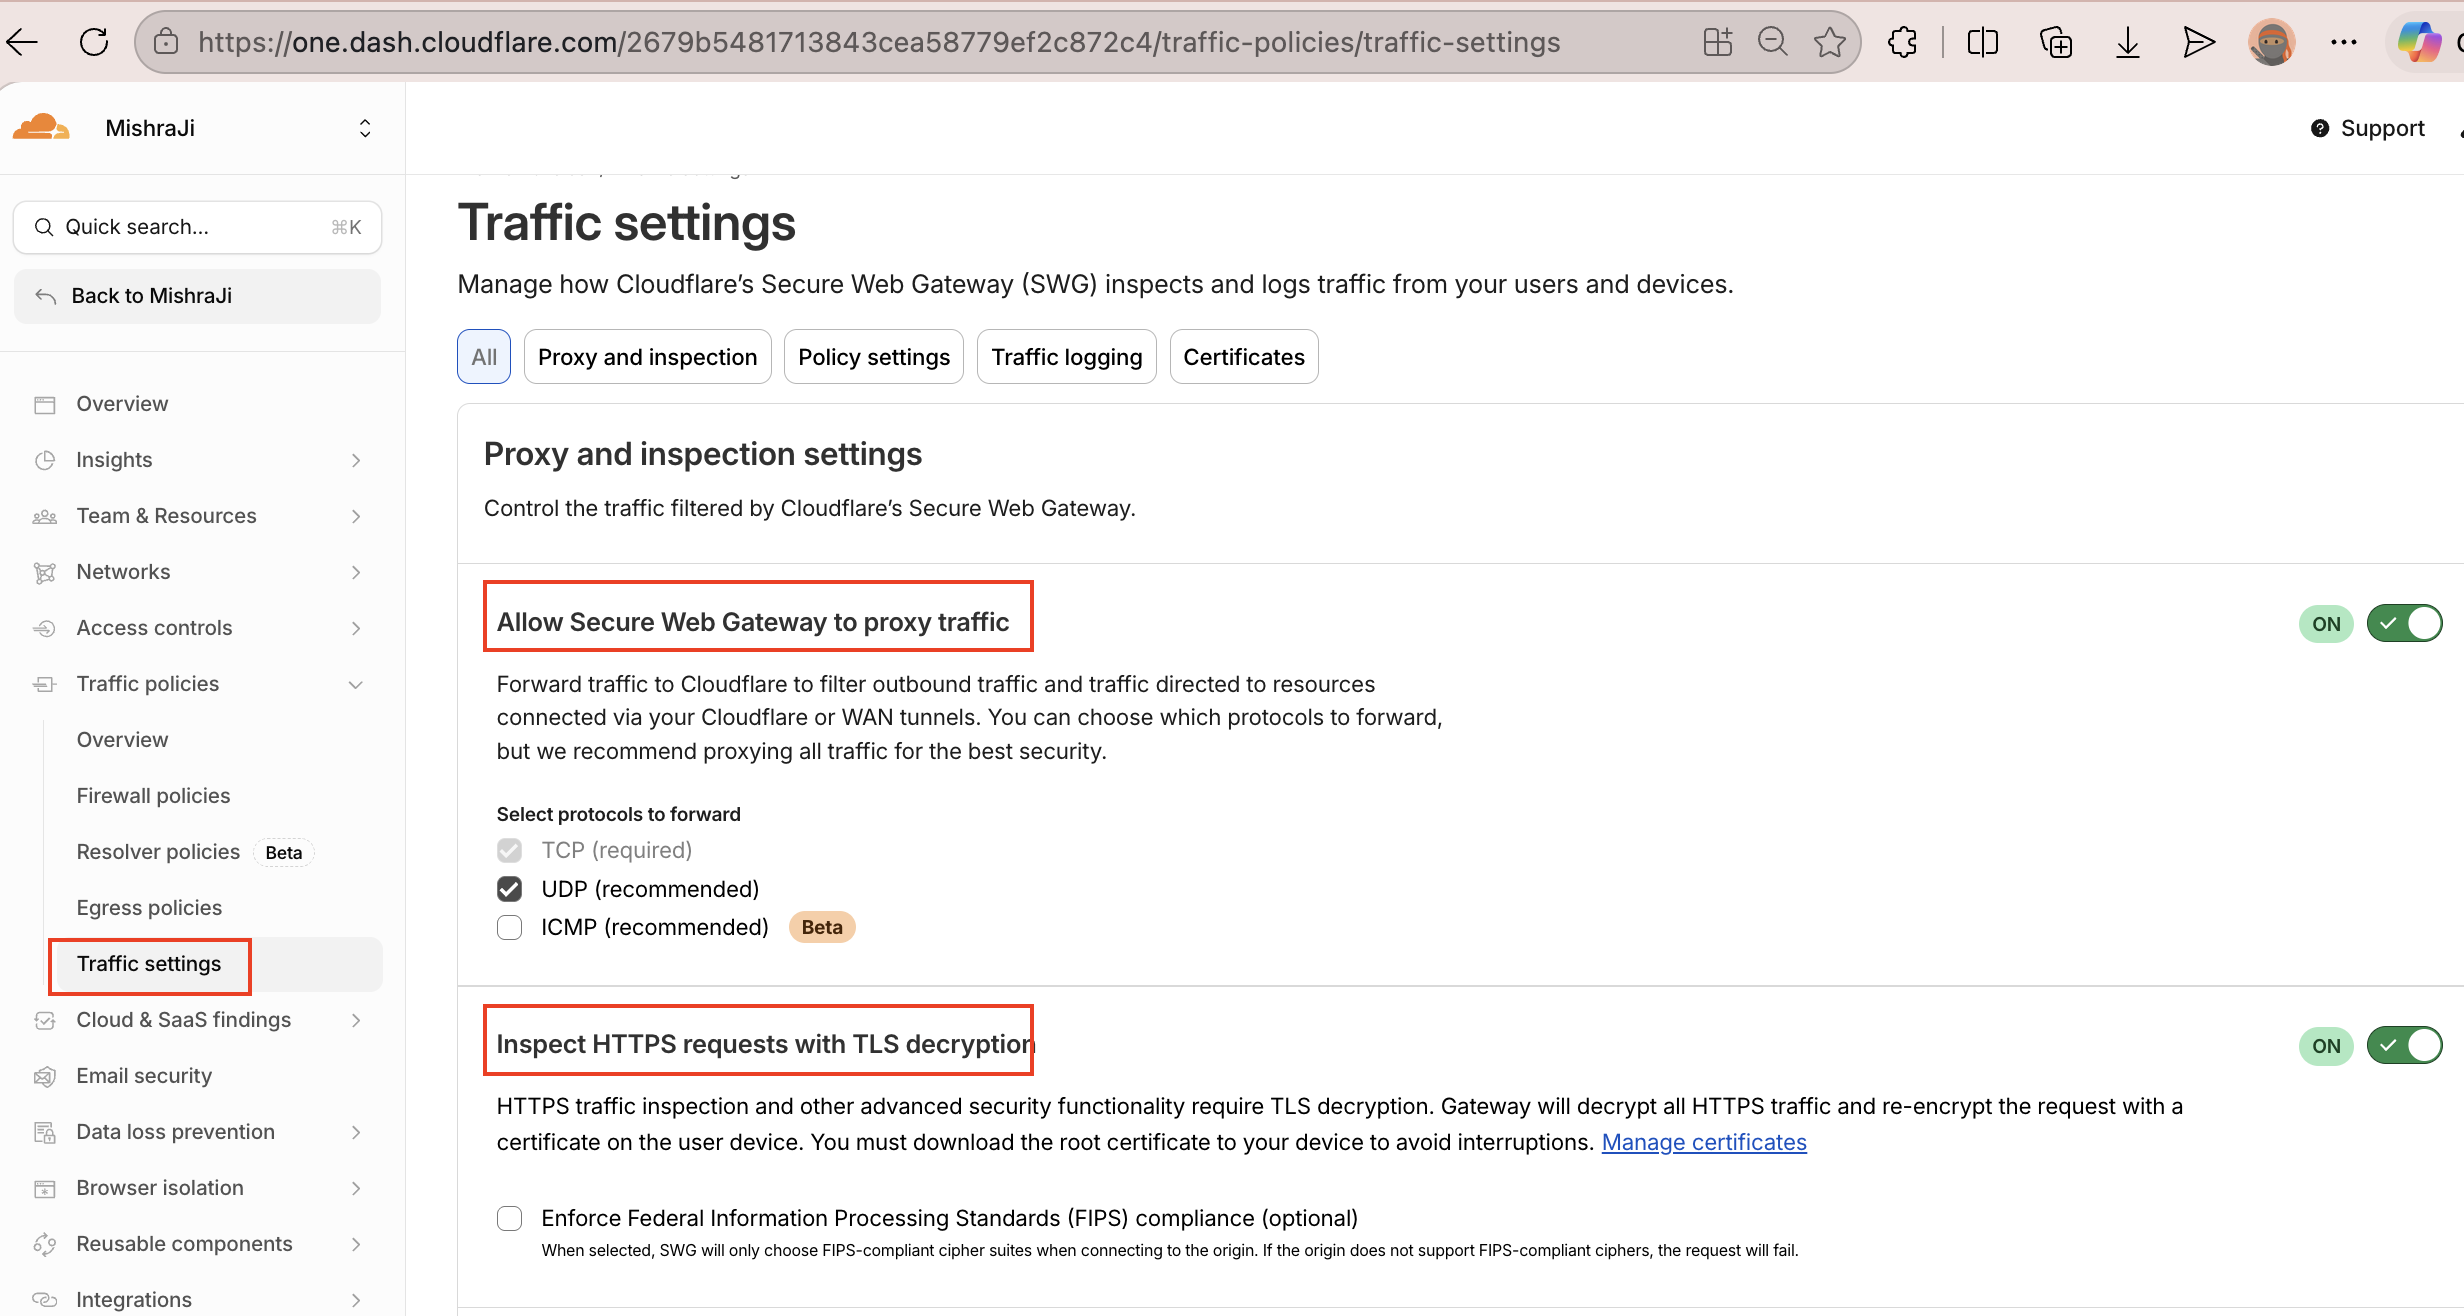
Traffic Settings
Testing
Before testing it out make sure to trust the cloudflare TLS certificate, otherwise you will get certificate issues while browsing HTTPS sites. The Cloudflare One client automatically downloads the TLS certificate and installs it in the System keychain.
Worth noting the fact that not all apps use the system certificate, e.g. Firefox uses its own set of trusted certificates and hence an app specific acceptence for the TLS certificate may additionally be required.
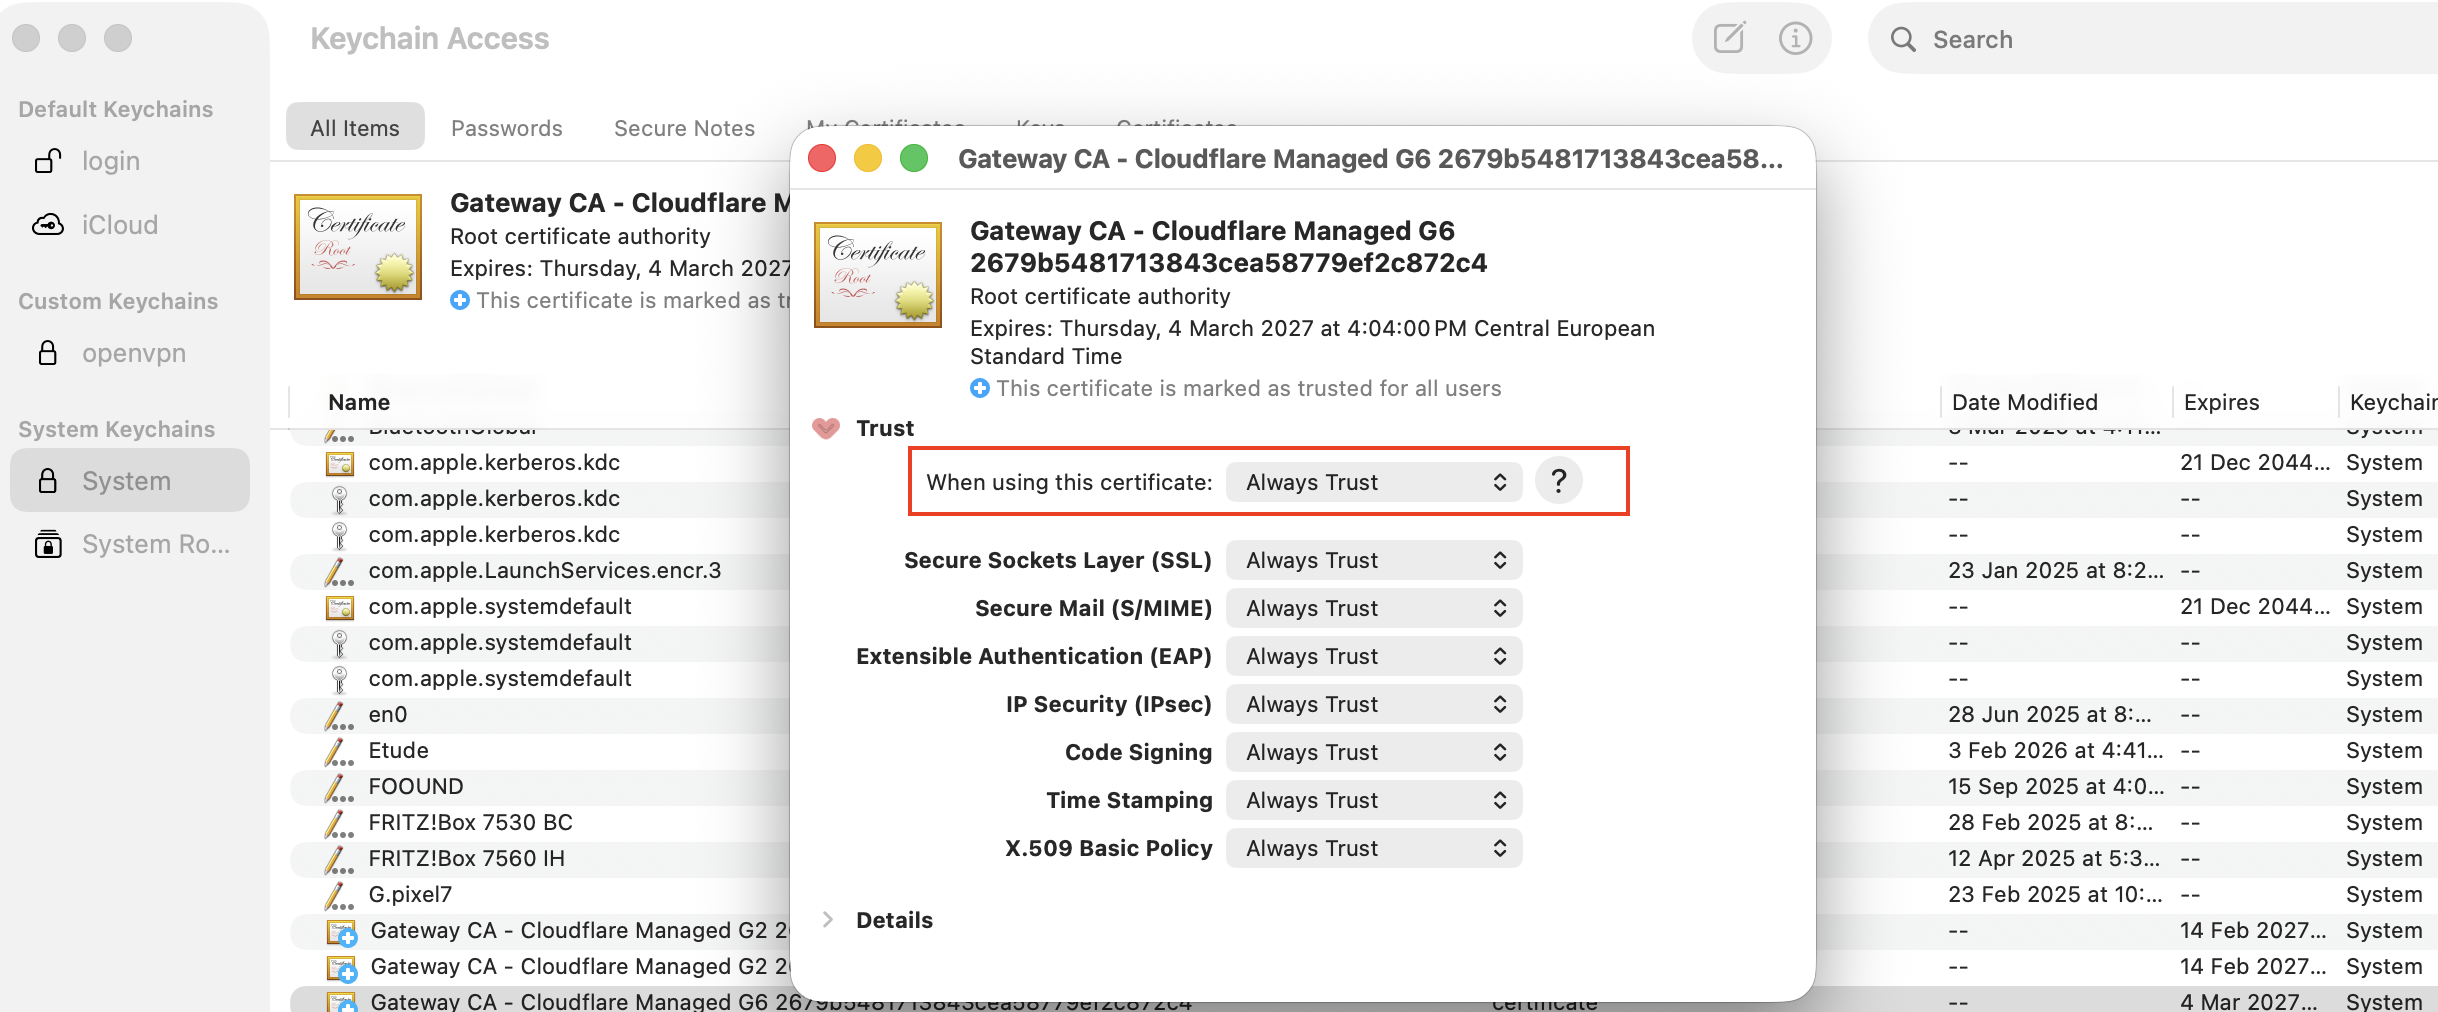
Mac Key Chain
Visit any social media site like instagram.com while connected to the Cloudflare One Client. Unlike DNS blocking where the browser just throws a connection error, this time you should see a custom block page served by Cloudflare — which is a much better experience.
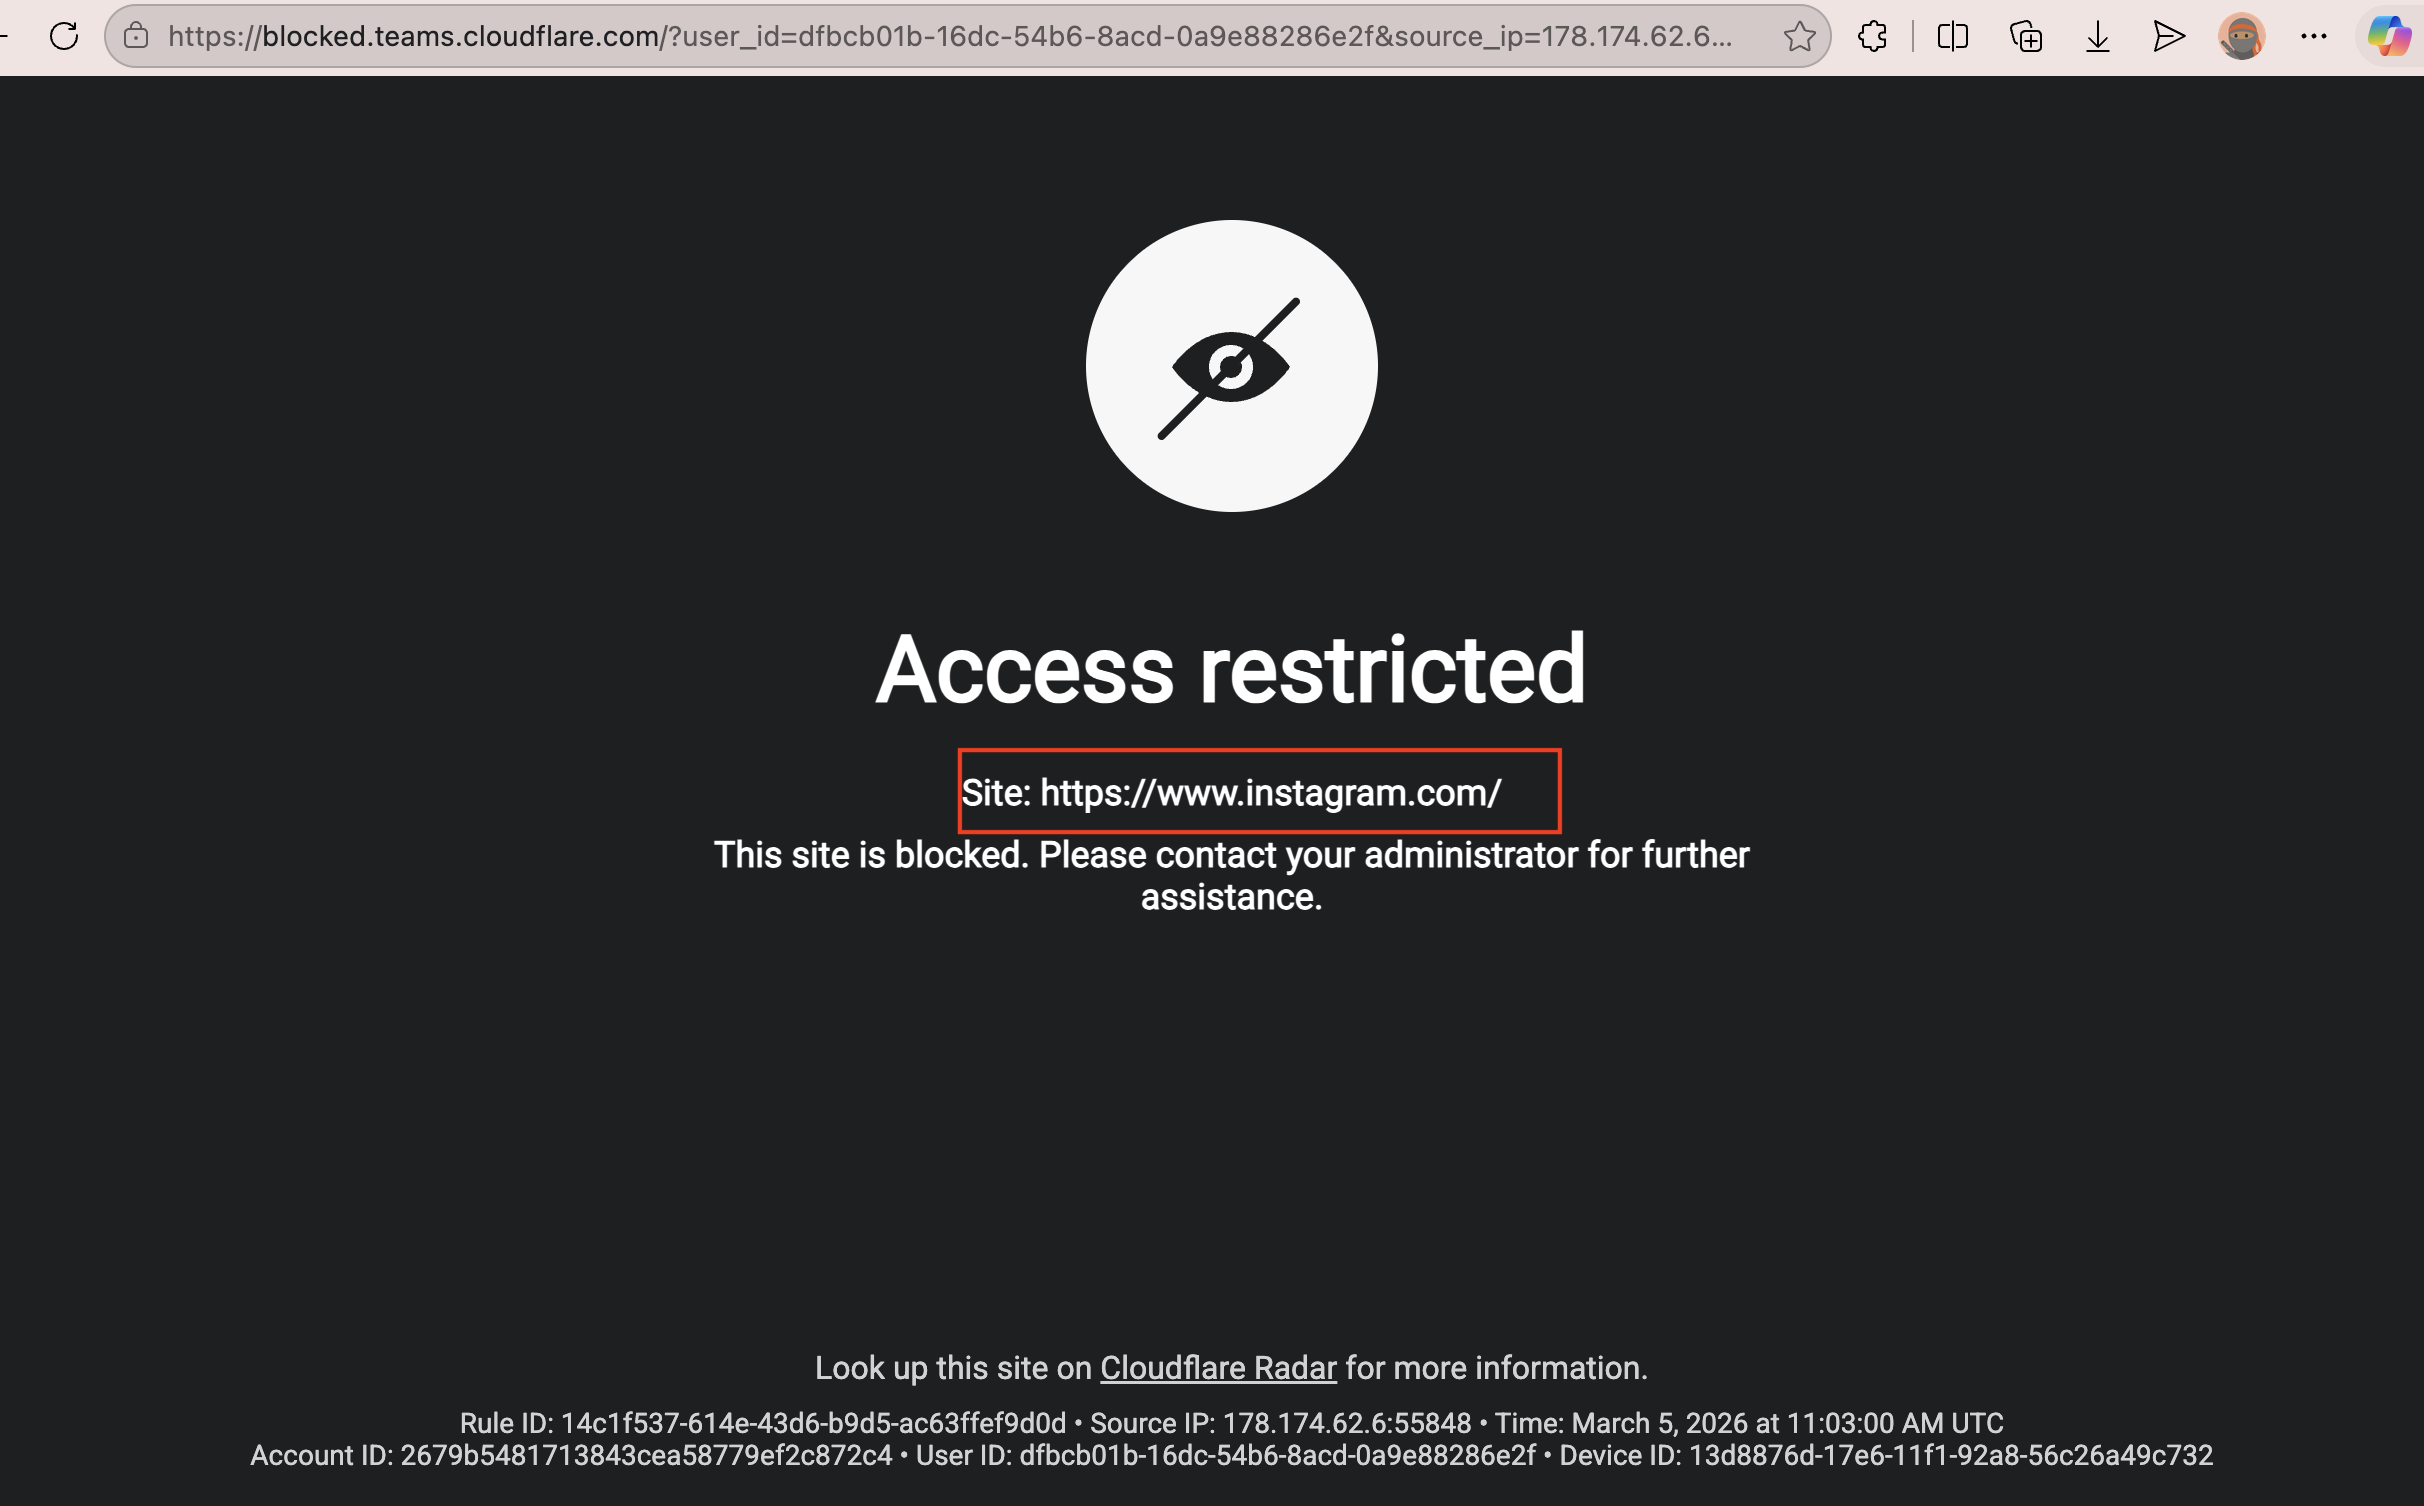
Page Blocked By HTTP Policy
Network Firewall Policy
How It Works
HTTP filtering has a gap too. It operates at Layer 7 — the application layer — so it understands things like URLs, query parameters, and HTTP headers. But it does not operate on IP addresses or port numbers.
Now imagine an enterprise device infected with malware trying to communicate with a Command and Control (C2) server. Malware typically skips DNS entirely and communicates directly using the C2 IP address. This makes DNS filtering useless — there is no DNS query to intercept. And HTTP filtering is equally useless here because Cloudflare categorises domains, not raw IP addresses — so there is nothing to match the policy against.
This is where a network firewall policy comes into picture. It operates at Layer 4 and can block traffic based on IP addresses and ports — catching exactly what DNS and HTTP policies miss.
Prerequisites
The “Allow Secure Web Gateway to proxy traffic” settings (same as required by HTTP policy) should be enabled for network policies to be effective.
Terraform Provisioned Resources on Cloudflare
-
Head over to Zero Trust → Traffic Policies → Firewall Policies → Network and you should see Gateway Network Policy listed there.
-
A cloudflare list of known malicious ip addresses. Head over to Left Pane → Reusable components → Lists
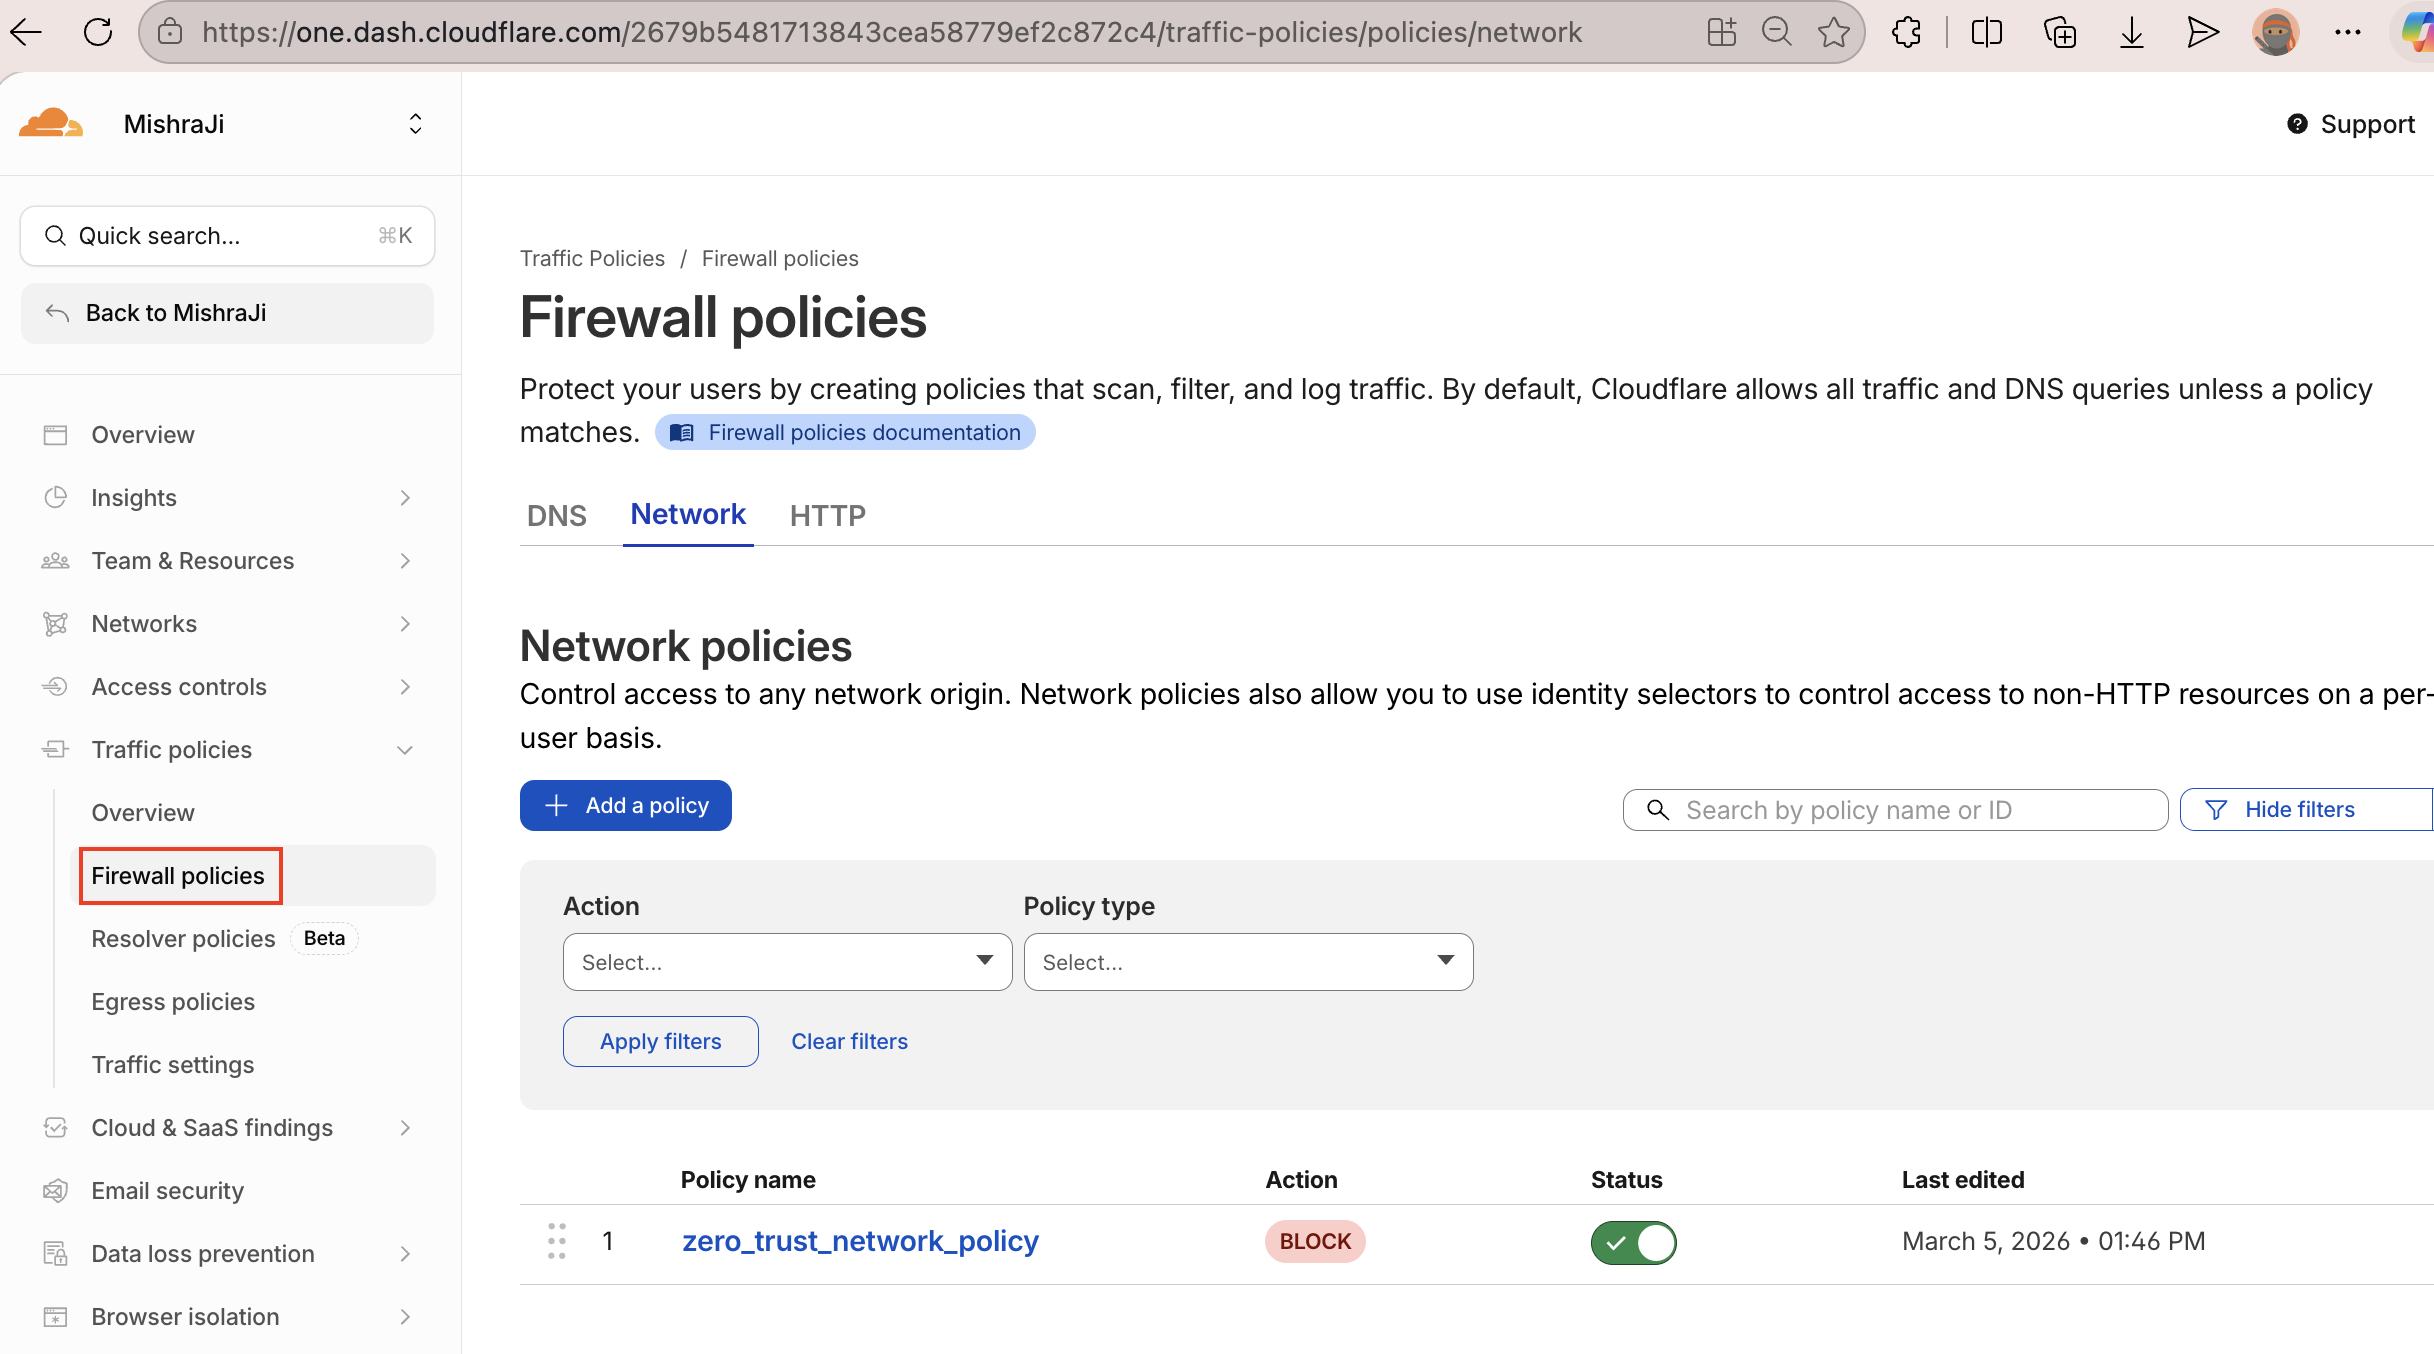
Firewall Network Policy
Testing Use your ip address and try to load it in the browser, the cloudflare gateway responds with a block page.
Page Blocked By Network Policy
Conclusion
Web filtering sounds intimidating but as you have seen, Cloudflare makes it straightforward. Define your categories, flip a flag, run terraform apply — and you have a working web filtering policy in minutes.
The DNS policy is the simpler of the three — no additional setup, just domain-level blocking. The HTTP policy gives you more control but needs TLS inspection and traffic forwarding enabled first. Once those are in place it works just as cleanly. Network policy allows blocking malicious ip addresses.